How to Build a Bike from a Box - Bike Assembly Guide
We ship our bikes as fully built as possible to minimize the delay between you and the trails. That means we will just cover how to build a bike out of the box, not a ground-up build from a raw frame.
Tools
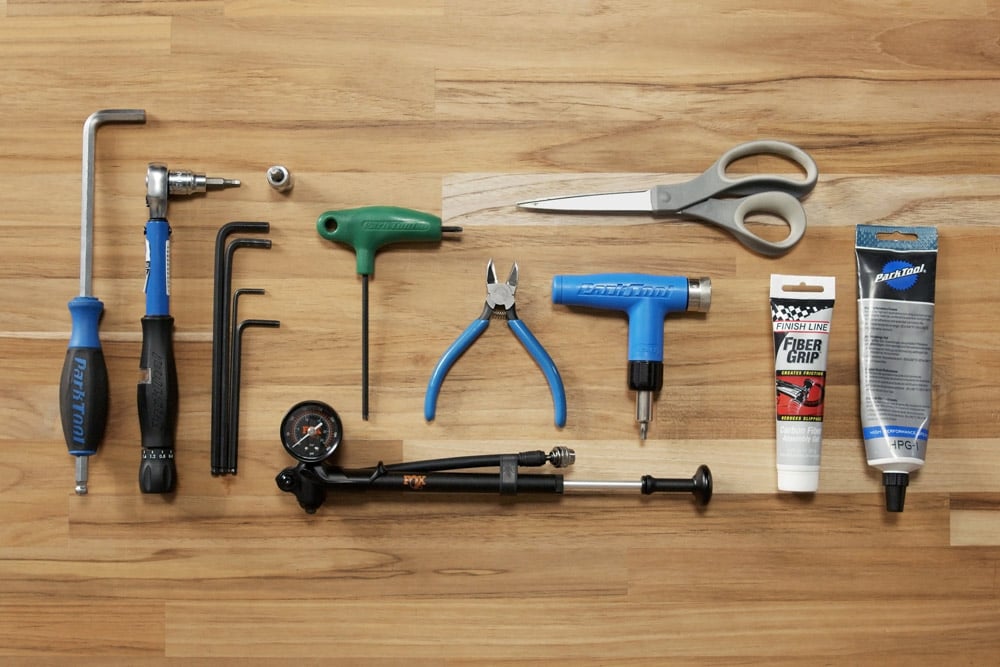
Before you get going, you'll need to gather a few common bike tools. Make sure you have the following tools close to hand:
- Metric Allen Wrenches
- Torx Wrench
- Torque Wrench
- Shock Pump
- Floor Pump
- Bike Grease
- Isopropyl Alcohol
- Carbon Paste (for carbon handlebars)
- Pedal Wrench (optional)
- Bike Stand (optional)
Shop Bike Tools >>>
1. Remove Bike & Loose Items

Open the box and pull any loose items out, including the front wheel. There should be a small parts box or bag, too.

Carefully pull the bike out of the box, but avoid lifting it by the saddle. This could damage your dropper post, if you have one. Cut the zip ties and remove any protective packaging. Be careful not to cut the frame or components as you do so.

Double check the packaging for small parts, and don't throw anything away. Set any packaging to one side and hang onto it until the bike is fully assembled.
Please note that our bikes now come wrapped in sustainable cardboard packaging, not the foam in the picture and video.
2. Attach Handlebars

Carefully detangle any cables and remove the stem faceplate. If you have carbon handlebars, apply a small amount of carbon paste to the inside surface of the stem where it contacts the handlebar.

Position the handlebar in the center of the stem and adjust to your preferred angle - there should be some markings to guide you. Carefully reinstall the stem faceplate.

Starting with the top bolts, thread the bolts in by hand and then tighten with a torque wrench, taking care not to exceed the torque spec written on the stem. Many stems have a specific clamp orientation, so double check this before tightening.

Take the wheel out of the box, and remove the plastic hub protectors. Check these for hub end caps.

Installing a Thru Axle
Your front wheel will have one of two attachment styles - either a thru axle or a quick release system. If you have a thru axle system, the axle should already be attached to the fork. Unthread and remove this first.

Remove the brake pad spacer and install the front wheel, making sure to carefully slide the brake rotor into the caliper on the left hand side. Once you’re happy with the position, slide the axle through the hub and tighten.

Installing a Quick Release Axle
If your front wheel has a quick release axle, tighten the nut until you’re able to feel some resistance when you close the lever. If you’re unable to close the lever fully, back the nut out by a quarter turn and try again.

If the wheel slides from side to side, check to see if the hub end caps are properly installed. They may still be attached to the wheel packaging.

Check Brakes
Check the brakes by squeezing the brake levers. They should not feel spongy or pull to the handlebar. Adjust the brake levers to your preferred position by using the appropriate wrench. Check the rotors for residue and wipe clean with isopropyl alcohol if necessary.

Install Pedals
Pedals come with a dedicated left and right. Check which is which, and then apply a little grease to the threads. Using your pedal wrench or allen wrench, tighten the right pedal clockwise. Then, attach the left pedal and tighten counterclockwise. Take care not to overtighten - use a torque wrench if you have one.

Check Shifting
Starting in the highest gear, pedal forward while shifting. You should be able to move smoothly across the cassette, shifting one gear with each click.
5. Inflate Tires & Adjust Suspension

Inflate Tires
Your bike may or may not come with tubeless tires. Consult the mechanic’s notes in the box for your bike’s specific setup. Preferred tire inflation differs from one rider to the next. Be careful not exceed the maximum recommended pressure indicated on the tire sidewall.

Adjust Suspension
To get your suspension set up, check the manufacturer's recommended sag and pressure settings. Use a shock pump to adjust your fork and shock accordingly.

Consult evo's Suspension and Sag Setup Guide for more details.
6. Adjust Seatpost

Adjust the seatpost to your preferred height using the bolts at the seat tube collar. The proper torque will be indicated on the seat collar.
7. Enjoy Your Ride!

If more adjustments are needed, please call one of our stores to speak with a service mechanic. We’re happy to help. If test riding a bike, please use pavement (driveway/neighborhood) instead of local trails, which may cause damage to the bike. We cannot accept a return after a bike has been ridden on dirt trails.
How to Adjust the Fit on Your New Bike
- Brake levers and saddle ship in neutral positions (45° for levers, 0° for saddle). These can be adjusted for personal preference if desired.
- When sitting on bike with the dropper post in the fully extended position, you should be able to make full leg extension at the bottom of your pedal stroke but not need to dip your hips side-to-side to reach full extension.
- If you feel like your knees are too high into your chest, or vice versa, try raising or lowering the seatpost at the seatpost clamp.
- If you feel that you have too much pressure on your palms, try raising the stem a spacer or two.
- Always set the sag on your mountain bike suspension.
Learn More With Our Other Bike Guides:
- Mountain Bikes - How to Choose
- Mountain Bikes - Size and Fit Guide
- Mountain Bikes - How to Get Started Mountain Biking
- Mountain Bikes - How to Choose a Wheel Size
- Mountain Bikes - Suspension Basics
- Mountain Bikes - How to Choose a Mountian Bike Dropper Post
- Mountain Bikes - How to Choose MTB Handlebars
- Mountain Bikes - How to Choose MTB Pedals
- Mountain Bikes - How to Change Bike Pedals
- Mountain Bikes - How to Clean
- Mountain Bikes - How to Bleed SRAM Brakes
- Mountain Bikes - How to Bleed Shimano Brakes
- Mountain Bikes - How to Convert to Tubeless Tires
- Mountain Bikes - How to Replace Internal Cable Housing
- Mountain Bikes - How to Adjust Your Rear Derailleur
- Mountain Bikes - How to Bleed a RockShox Reverb Seatpost
- Mountain Bikes - How to Service Fox and RockShox Fork Lowers
- Mountain Biking - What to Bring Mountain Biking
- Mountain Biking - What to Wear Mountain Biking
- Mountain Biking - How to Choose Knee Pads
- Bikes - Size and Fit Guide
- Gravel Bikes - How To Get Started Gravel Biking
- eBikes - Classes, Features & More
- eBikes - Where to Ride eBikes
- Bike Accessories - Helmet Size & Fit Guide
- Bike Accessories - How to Choose Bike Shoes
- Bikes - How to Choose Bike Tires
- Bikes - How to Change Bike Pedals
- Bikes - How to Repair & Replace a Bike Chain
- Bikes - How to Choose Accessories
- Bikes - Urban Riding Tips
- Travel & Destination Guides - Where to Mountain Bike
Learn About our Favorite Bike Gear:
The Best Women's Mountain Bikes
The Best Electric Mountain Bikes
The Best Mountain Bikes for Beginners
The Best Mountain Bikes Under $3,000
The Best Trail Bikes
The Best Enduro Bikes
The Best Gravel Bikes
The Best Mountain Bike Helmets
The Best Full Face MTB Helmets
The Best Mountain Bike Knee Pads
The Best Mountain Bike Elbow Pads
The Best Mountain Bike Shorts
The Best Women's Bike Shorts
The Best Mountain Bike Pants
The Best Mountain Bike Jerseys
The Best Mountain Bike Accessories
The Best Value Mountain Bike Helmets
The Best Dropper Posts
The Best Mountain Bike Forks
The Best Mountain Bike Stems
The Best Padded Mountain Bike Shorts
The Best Mountain Bikes Handlebars
The Best Gifts for Mountain Bikers
The Best Mountain Bike Gloves
The Best Mountain Bike Socks
The Best MTB Fanny Packs
The Best Mountain Bike Backpacks
The Best Clipless Mountain Bike Shoes
The Best Flat Pedal MTB Bike Shoes
The Best Mountain Bike Tires
The Best Mountain Bike Flat Pedals
The Best Bike Racks
The Best Bike Glasses
The Best Bike Goggles
The Best Women's Mountain Bike Jerseys
The Best Tailgate Bike Pads
The Best Bike Trainers
The Best Hitch Bike Racks
The Best Clipless MTB Pedals
The Best Mountain Bikes Handlebar Bags
The Best Mountain Bike Saddles
The Best MTB Wheels
The Best MTB Grips
The Best Mountain Bike Multi Tools
The Best Mountain Bike Seat Bags
This is evo. We are a ski, snowboard, wake, skate, bike, surf, camp, and clothing online retailer with physical stores in Seattle, Portland, Denver, Salt Lake City, Whistler, Snoqualmie Pass, and Hood River. Our goal is to provide you with great information to make both your purchase and upkeep easy.
evo also likes to travel to remote places across the globe in search of world-class powder turns, epic waves, or legendary mountain biking locations through evoTrip Adventure Travel Trips. Or, if you prefer to travel on your own, check out our ski & snowboard resort travel guides and mountain bike trail guides.
Still have questions? Please call our customer care team at 1.866.386.1590 during Customer Care Hours. They can help you find the right setup to fit your needs.